
2011-06-22
Rooftop Canoe Carriers are still for Sale in Canada

2010-09-12
A Use for Waternoodles - bringing the kayak home
 With the old kayak, for years my preferred, tried and true method of carrying it on the car was to place four foam pads (as pictured here) on the coaming boards and then place the craft upside down on the roof of the car. I would then tie two ropes over the canoe down to four gutter hooks as well as tie the bow and stern to the car frame below the bumpers. For years one could buy a canoe carrying kit made up of these four pads, yellow polypropylene rope and 4 automobile gutter hooks. Such a kit is still available today for about $35.00.
 |
| Note front ropes pull back while rear ropes pull forward |
Water noodles are colourful long flexible foam tubes used as flotation toys and are available from the dollar store for $1 or for $2 or $3 in regular stores.
Schuyler cut lengthwise slits into the water noodles and then pressed them onto the kayak coaming. We then put the kayak on the car roof and tied it down in the conventional method. This method is well shown in the following photos.
 |
| Water noodles, straps and gutter hooks |
The tie down method used here is based on experience borrowed from a long time canoe outfitter near one of our Ontario Provincial Parks. It is simple, effective and inexpensive. To quote Leonardo da Vinci, "Simplicity is the highest form of sophistication." The technique is typically used for North American open canoes but works just as well with the kayak.
There are a number of important details that must be followed to make this installation secure.
 |
| Two point hitch |
2. The fore and aft ropes must be properly tied and anchored to the canoe with a knot and not merely allowed to slip through the pad eyes. This ensures that the craft will not shift from side to side. I found it easy to use a simple overhand loop that I tied in the middle of the rope.
More Details on the Tie down Method
Knots: Again keeping the installation simple, the only two knots required are the overhand loop and the half hitch. These are neither elegant nor sophisticated but do the trick quite well and are very easy to remember.
 |
| Overhand loop |
The half hitch pictured here is borrowed from Wikipedia.
To tie the canoe to the front and back of the car use a rope that is about the same length as the kayak ~ 5.5M or 18 feet. Larger vehicles may require longer ropes. These are typically used as lines to tie up the kayak when in use and floating.
 |
| Half hitch |
Then create a two point hitch to the car. Do not make only a one point hitch to the center of the car since this will allow the kayak to shift in a strong cross wind. So what do we tie it to? North American cars have holes drilling into the frame under the car (likely to accommodate tie down hooks for ferries), while most cars that are imported to North American have convenient steel eyes welded to the frames in all four corners. This is likely because the imported cars needed to be tied down for long voyages when imported on freight vessels.
So for North American Cars you will need to buy 4 "S" shaped hooks to hook into the frame holes. These hooks can be found at any hardware store.
 |
| Overhand loop and hitches |
Repeat this process for each of the four ropes. The ropes at the back of the car will be much tighter than the front, but the front should be tight also.
Be sure to tie up the ends of the rope and leave no more than a couple of centimeters or an inch loose at the end. If the end is too long it will flap against the car and can severely damage the paint surface besides making the annoying flapping noise.
This installation as described so far is quite adequate for a short haul of an hour or so. For our trip to Nova Scotia which required a full two days of travel over 1500 km we used additional straps or ropes and gutter hooks as an added precaution. Like combining belts and braces, either system will work on its own. There are also kits with flat straps with buckles and gutter hooks that work just as well.
Strap vibration tip: In the case of flat straps, at high speed one can get serious vibration in the straps due to wind. To avoid that just put a twist in the strap in the part that is vibrating. This will spoil the laminar flow of the air around the strap and stop the vibration completely.
The pictures taken here were the exact installation after the first day of the voyage.
2010-08-26
The First Launch/maiden voyage and Sea Trials (or Rather Creek Trials)
 This afternoon we had some free time after work and the weather cooperated, also the paint has now hardened well on the Kayak, so we took the kayak for its initial launch at the Kars Boat Launch. Schuyler and first step cousin once removed Andrew Zeigler took the kayak "Sexy Girl" on its first voyage in Steven Creek a tributary entering the Rideau River at Kars Ontario.
 The craft was fully water tight and performed well. The build was a success. This was a trial not only of the craft but also of the neophyte navigators.


2010-08-20
Done!!
 At around 3 pm today we put the last touches to the kayak. The first coat was pretty much dry this morning, so we proceeded to install the cockpit coaming , and then took the craft back outside. We then installed the keel, two bilge keels, the rubbing strips and floor boards all of which were already prepared and painted. We then applied the final coat of paint, and then installed the eye pads into the wet paint thus ensuring a good seal around the screws.
From here on forward we will let the paint dry good and hard for two days before we try it in the nearest river called the Rideau River. This will require mounting the canoe on the car and driving it about 5 km. to launch. This will be a useful exercise since we will also be taking this craft on our car to Nova Scotia. The trial will be that of properly mounting the kayak on the car so that it will endure the shake, rattle and roll, of the 1540 km drive to Nova Scotia.
 There are a few small outstanding items to add like the back rests, if Schuyler wants them, but for my old canoe I used an old board foam life jacket that performed admirably as a seat and backrest and used it throughout the nearly forty years of paddling. I also did a lot of portaging with the old one so this required a specific yoke to carry it on my shoulders - North American canoe style. Seats and backrest just added extra unwelcome weight to the portages. I think Schuyler and his family's requirements will likely be different so they may wish to add a modified backrest and dispense with the yoke idea.This will be a project for Nova Scotia.
 About the Paint
I was quite astonished by how much paint the boat required. While the instructions and plans called for half a gallon of paint we went through 5 litres or about a gallon and a quart. I suppose we could have stretched it some by thinning down the first coat which we didn't do but it could not have made that much of a difference. Also the canvas was not "proofed" as the plans require. Maybe proofing means something different but to me proofed meant waterproofed. After the paint is hard I intend to preserve the interior of the canvas by sloshing a litre of liquid wood perservative. This is what I did with the old boat and it worked quite well I recall.
If anybody knows what "proofed" means and if it does not mean to waterproof, please weigh in and add a comment to that effect. It would be much appreciated. We will now take a couple of days rest from the kayak. In the next blog post we will report on its inaugural launch, be it here or in Nova Scotia depending on the time available.
First coat of paint

About the Fiberglass Resin Hardner
I have always found that the instructions on the can are usually the most precise for the application of the contents, ergo hearsay is often misleading. In this case for small amounts the instructions called for 12 drops of hardner for 30ml (ounce) of resin. I rummaged through the recycling bin and found and cleaned out a small cat food tin that held just over100ml of resin which required about 40 drops of hardner. Schuyler poured it all into a maragarine tub and mixed it. This gave just the right amount of product for one application before it hardened.
 We followed these instructions exactly and found that the resin carmelized quite quickly and became quite hot. Funny how one only remembers by doing. I now recall that I used much less hardner on previous boat work than the container instructions called for. In fact I even remember now how with too much hardner, the final application became very brittle and that I always used about a quarter to a third of the required hardner and ended up with a rather nice supple application. The latter would not shatter when impacted by a rock while the the original brittle recipe would.
In the end we used about 10 drops of hardner with 100 ml (3 oz.) of resin. And that is hearsay.
 We followed these instructions exactly and found that the resin carmelized quite quickly and became quite hot. Funny how one only remembers by doing. I now recall that I used much less hardner on previous boat work than the container instructions called for. In fact I even remember now how with too much hardner, the final application became very brittle and that I always used about a quarter to a third of the required hardner and ended up with a rather nice supple application. The latter would not shatter when impacted by a rock while the the original brittle recipe would.
In the end we used about 10 drops of hardner with 100 ml (3 oz.) of resin. And that is hearsay.
2010-08-19
The last Parts to build

 |
| Second coat on nose with fiberglass. |
Schuyler did a masterful job, sticking the cloth down with the resin by dabbing and stroking the fibres. We created little disposable brushes by furling bits of discarded canvas which worked very well. The end product looks quite professional and a lot better than my building project of the old canoe in '74. A trick which I did not know then was to cut along the warp of the cloth and then remove about 5 warp strands along each edge. This eliminated the development of loose strands that would get mixed into the resin and make it quite messy with blobs of string.
Planning around the Weather
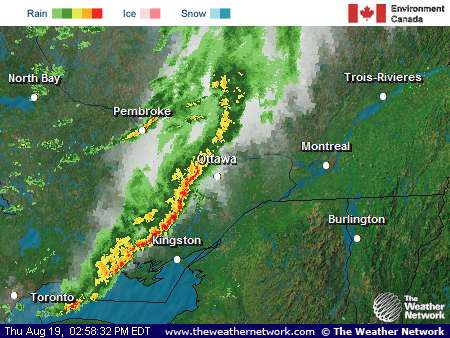
There was no avoiding it so we took our project indoors before applying the paint.
40 years ago the only advanced warning was thunder 10 minutes, maybe 20 minutes before the storm.
Hammer Nose

2010-08-18
We have a boat
We made great progress today.  The weather behaved wonderfully -- sunny, no wind, quite warm but not too hot. Because of the weather we decided to commit the entire day to the kayak.
In this photo we nearly completed the bottom canvas installation. The old canoe is on the ground behind me, which we kept handy for reference.
During the cooler hours of the morning Schuyler painted the rubbing strips that go on the gunwales, the bilge keels and the main keel (rubbing strip). We built and varnished the floor boards. After lunch we put the canvas on. I didn't remember actually how difficult it was from my experience in the original build. It was so much easier and straight forward then, profiting most likely from complete ignorance of the task at hand and blatant inexperience.
We managed to get all the canvas on and were hoping to have time to put the first coat of paint on but the sun was setting quickly by the time we finished the canvas. You will see from the photos that we had to move the project several times to keep the project out of the shadows and in the heat of the sun.
It is now starting to look like the lovely craft that it was intended to be. From this point on we are really finishing the canoe.
In this photo Schuyler is the proud future boat owner - somewhat amazed at what has developed before his eyes.
Some technical boring stuff:
To fasten the canvas, we decided to continue to go with Lepage PL Premium construction adhesive -- which we already used for the wood, and a regular staple gun and staples rather than copper tacks . Copper tacks are not a regular hardware item in these parts. Besides that the use of a staple gun makes the installation so much easier. I found that the few iron parts that I had on my old canoe didn't really show much corrosion, again because it was usually well stored, and such parts were well painted. In this case, there is one significant difference though. Schuyler lives in Nova Scotia where probably half of the paddling will be in salt water and half in fresh water. I very rarely ventured into briny water yet with the old boat so have no experience with the salt exposure.
Based on my professional career though, I do recall that salt water was significantly more corrosive on untreated steel. Another reason that I was not too worried about this decision was that for the old kayak the copper tacks had minimal impact on the integrity of the canvas installation. The tacks being almost completely tapered were extracted easily after a while and the glue was doing all of the work. Since we are using the very strong and effective PL Premium to hold the canvas, I suspect that the staples' main role will be in keeping the canvas in position while the glue hardens. My ony concern now will be if the staples rust if they will stain the fabric. I will be keeping an eye on the progress of this vessel and will most likely blog on this again in 10 years if blogs are still in vogue.
 The weather behaved wonderfully -- sunny, no wind, quite warm but not too hot. Because of the weather we decided to commit the entire day to the kayak.
In this photo we nearly completed the bottom canvas installation. The old canoe is on the ground behind me, which we kept handy for reference.
During the cooler hours of the morning Schuyler painted the rubbing strips that go on the gunwales, the bilge keels and the main keel (rubbing strip). We built and varnished the floor boards. After lunch we put the canvas on. I didn't remember actually how difficult it was from my experience in the original build. It was so much easier and straight forward then, profiting most likely from complete ignorance of the task at hand and blatant inexperience.
We managed to get all the canvas on and were hoping to have time to put the first coat of paint on but the sun was setting quickly by the time we finished the canvas. You will see from the photos that we had to move the project several times to keep the project out of the shadows and in the heat of the sun.
It is
 now starting to look like the lovely craft that it was intended to be. From this point on we are really finishing the canoe.
In this photo Schuyler is the proud future boat owner - somewhat amazed at what has developed before his eyes.
Some technical boring stuff:
To fasten the canvas, we decided to continue to go with Lepage PL Premium construction adhesive -- which we already used for the wood, and a regular staple gun and staples rather than copper tacks . Copper tacks are not a regular hardware item in these parts. Besides that the use of a staple gun makes the installation so much easier. I found that the few iron parts that I had on my old canoe didn't really show much corrosion, again because it was usually well stored, and such parts were well painted. In this case, there is one significant difference though. Schuyler lives in Nova Scotia where probably half of the paddling will be in salt water and half in fresh water. I very rarely ventured into briny water yet with the old boat so have no experience with the salt exposure.
Based on my professional career though,
 I do recall that salt water was significantly more corrosive on untreated steel. Another reason that I was not too worried about this decision was that for the old kayak the copper tacks had minimal impact on the integrity of the canvas installation. The tacks being almost completely tapered were extracted easily after a while and the glue was doing all of the work. Since we are using the very strong and effective PL Premium to hold the canvas, I suspect that the staples' main role will be in keeping the canvas in position while the glue hardens. My ony concern now will be if the staples rust if they will stain the fabric. I will be keeping an eye on the progress of this vessel and will most likely blog on this again in 10 years if blogs are still in vogue.
Subscribe to:
Posts (Atom)